Monday, September 30, 2013

Flower makeover monday

Paper flowers we have allot of them but some times we want them to match and all we can find are flowers like this. Some with prints and in all different colors. So what would you use? I´m going to use nail polish, some may say I obsessed with nail polish but I not, I think... I have just enough. Lets get started.


The darker color I just painted with once but the grey I had to do almost three coats. When the flowers has a darker color you either take a dark color or start with exempel white as a base. The best thing is that you can layer colors and glitter polish as many times as you want and the flowers will only get stronger.  Try it out and tell my what you think. 

Love Julia

Friday, September 27, 2013

Jewelry by Julia K

What is it that we all love? but jewelry of course. So today I´m going to show you the jewelry that I´ve made.


I hope you like them and have a great weekend

Love Julia

Thursday, September 26, 2013

Namesday card

On Sunday it´s Mikaela how has namesday and that´s me and my aunt so I though I make her a card. Just a quick and cute card to send her some love.

want to see more, go to instagram: juliammkallen.
and for inspiration and randomness head over to my pintrest: http://www.pinterest.com/juliakallen/boards/

Love Julia

Tuesday, September 24, 2013

Britta

 It´s such nice weather this day even though it´s mid September and we live in Borås (an hour from Gothenborg, so we get all the rain.) But this last days the sun shone so I let out Britta. When there is nice weather I let here jump around, for a little bunny she has allot of energy.
Off and away.
How close can I get, Britta wonders. 

I got the feeling that Britta got rather bored. 
She is a real cutiy.  
Britta tried to see if she could fly, I should never have shown her the movie Dumbo...
 Just three weeks ago Britta came here as a baby and now she is a bit bigger baby. The more time we spend together and get to know one and other I see how she changes. She is very forward and love to explore and to cuddle when she is done.

Love Julia & Britta

Book page weave card


I´m so lucky to have such good friend and let my tell you they are so creative. So this card is inspired by my girl Ellen.


Check out Ellens artwork:
http://rosewindow.deviantart.com/


So I started with weaving book pages that is about 1-1,5 cm. This is a bit time consuming but really fun. If you co with solid color the "Weave" will be more protruding. The weave I glued on the card and gave a light mist of my mixed glimmer mist (gold glimmer and brown ink)


Then this is the embellishment I plan to use. I pulled out the glass flowers from yesterday and a Magnolia Stamp.


And here we have the finished card, inspired by Ellen and decorated with the glass flowers, bling swirls, a Magnolia stamp and washi tape from Panduro Hobby.


Love Julia

Monday, September 23, 2013

Flower makeover

It´s flower makeover Monday! Today's technique I call the glass flower effect. To do this you will need:

Paper flowers
clear stamp pad, or one with glue
embossing powder with glitter
UTEE- ultra thick embossing enamel


Start out with covering the flower with the clear stamping pad, I use this small Versa Mark, but their is allot of different brands that you can use from.


The first powder is the one with glitter, heat is up and then drop the flower in the UTEE. If you´re not so sure on the step, let the flower cool and go over it with the stamp pad again and drop it in the UTEE. (I pore the UTEE in a bigger container, this way it´s really easy just to put the hole flower in and give it a shack.) The UTEE step I repeated 3 times with really gave the flower that glass effect.


The thing is that after all the cotes with embossing the paper becomes see though and they really looks like glass.


Here you can you see how the before and after, flowers.


Hope you like it

Love Julia

Friday, September 20, 2013

Pysselskafferiet

Not very many people can work with their dreams. Stina does, she has a blooming craft business that is 20 years old. For the past 5 years she has been in a local 10  minuets from Borås, in Gånghester. After looking though the webbshop and blog I headed over to the store.

The store is in a basement so the selling is rather low and their are only a few windows. The owner, Stina describes her store like a pantry. The word the comes to my mind while steeping in was more, the cave in Aladdin, filled with treasures. The atmosphere is so worm and welcoming and the girls that work there are so friendly. Every way you look there is inspiration and not just for cards or layout but for alters and paintings. All you want to do i to touch everything for their are so many pretty things to touch. Even tough the space is packed, everything is in it´s place and you can actually find things. And they have close to everything you need. Flowers, bling, papers from Maja Design to Prima. Maybe you are just in love with alter boxes, books or bird feeders, they have it!

You will definitely get inspired by the shabby chic/ vintage style int the store.


Lovely papers from Swedish designer like Pion and Maja Design and big brands like Prima and Graphic 45

Roses in all colors thinkable
Wood shapes ready for some paint and paper

An example of what you can do to the birdhouse
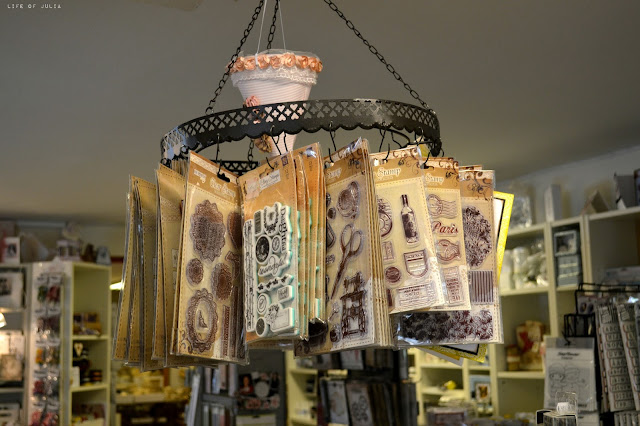
Everything in the store is done so cute, just the simple idea of hanging the stamps.

One of the many popular brands, Maja Design
Just imagine what you can do to this guy with the flowers and papers in the store.
Want more? Their blog: http://www.pysselskafferietdt.blogspot.se/

I hope this will inspire you like it has inspired me. I will definitely go back soon and tell all of my fellow crafters.

Love Julia

Thursday, September 19, 2013

Scrapbookpage: Britta in Peach


 This layout will be in the LLC September challenge: http://liveandlovecrafts.blogspot.co.uk/2013/09/challenge15.html.
The challenge was to create something from a collage of photos. This is what I did.


You know how I do layouts by now so here are the process:
Love Julia

Wednesday, September 18, 2013

Stamping Organization


As a crafter and scrapbooker we all have allot of small items that disappears all the time. One of those thing are my stamps and for years I have try ed to find the perfect organization of them. I´ve had them in a draw but could never find the one i wanted. I´ve tryed to sort them by them and then in plastic pockets, this took up way to muck space and the pockets broke. So for some time ago I thought about this idea. It´s just a A4 binder with 4 photo pockets on each side, 8 in total. This is perfect for me, I can easily see all of my stamps, they don´t take up more space then a binder and the photo pockets are the right size. In this pockets the stamp fits (and my clears stamps also fits) And the best part is that I can put the images in with the stamps if I get any left over.

But not all stamps are small enough to fit in the pockets, then I just take a full A4 plastic pocket. (image no 4) So now I have tyred this system for quite some time and I can say that I will not change a thing!
How do you store you´re stamps? Let me know in the comments below or on pintrest

Love Julia

Tuesday, September 17, 2013

Fabric tape banner

Fabric tape is getting more and more popular and today I´m going to show you my favorite way of using it.

To make the fabric tape banner you´ll  need:
fabric tape
string
scissor


Cut of a piece of and put the sting in the middle. Fold the piece over.


Cut the edge to two point or one.


Fill the string with more piece in till you get the length you want. And that is how you´ll do it,  super easy. I sometimes decorate it with some bling or pearls but the possibilities are endless.


So this is one way the banner can be used, on a simple card with some gold bling.


Love Julia
Monday, September 16, 2013

Flower makeover


Today I´m going to go through how I did the flowers that are on the "Britta & Julia" http://juliakallen.blogspot.se/2013/09/scrapbookpage-britta-julia.html,

I started with a flower (well obviously) ( www.pyhobby.se ) that just has color on the edges, witch makes them really easy to color.


So now I cut of the stem so I can take out the pistils.


Like this. Now there is just two paper flowers.


When I color flowers like this (with green in the middle.) I start with spraying with a light color glimmer mist or similar, or water if you don´t wan´t the sparkly. When the flower no longer is dry i take and dip a green color in the middle. Because the flower is wet the green will move out and will not look so stark.


And this is how it looks on the layout.


Love Julia

Sunday, September 15, 2013

Scrapbookpage: Britta & Julia


Let start with the first page with me and Britta! The paper is from Magnolia in blue/ lilac with my favorite flower, the hydrangea.


I tyred to challenge my self this time by layering. So I pulled out pattern and soiled card stock in the color scheme.


This flowers have I altered with some mixed glimmer mist. I took some Pearl swirls that I cut apart and used they as stem.


So here is the finished layout. All the colors is in a light blue, cold lilac and then I pulled in the deep raspberry in card stock and in the big flower. The smaller flowers has that same deep raspberry color on the edges.

Paper: www.magnolia.nu
Flowers: www.pyhobby.se


Love Julia

Tuesday, September 10, 2013

Stamps

Stamping is so much fun but mounting them can be a bit tricky if you never have done it. This is how I do it.

I start with my rubber stamp (this one is from Magnolia) and some EZ Mount. I put the stamp on the EZ and draw around it.


I use a breakable knife, you can use scissors if you wont. I like the knife and think it gives a bit more control. This knife I only use for this sens they tend to get rather sticky.


Now just put the stamp on the mounting and touch up around the edges. Use a acrylic block for stamping. This come in all sizes, this one is fairly big.


Take a ink pad and cover the stamp.


And stamp!
It´s not so hard but a bit tricky the first times. Here you see an example off how a stamping motive can be used.

I hope this helped you

Love Julia

Monday, September 9, 2013

Britta the Bunny

Little Britta has gotten a new leash in a houndthoth pattern. I think it's really cute and perfect for when we start training. We have had a couple of jump and she is a natural. Here in Sweden bunny jumping is a sport and when I was younger I had a bunny that I jumped with. Now I hope that Britta and I can train and hopefully one day compete. 

Love Julia

Saturday, September 7, 2013

Britta

You see this cutey, her name is Britta. She is only 6 weeks and not afraid of anything. This I´m not so sure is a good thing thou we live with hunting hounds... She loves the dogs and the dogs like her to, not in the same way but still. First I though she would live in my "studio" in the old stable. After two nights she now is in my bedroom.  She has gotten a litter box, like the one cat´s has but allot smaller. This she really loves, to lie in. Yup I´ve got a weird bunny.

Love Julia

Wednesday, September 4, 2013

Macaroons


There is some things that we want to be able to do and when we finally take the step that step is a leap. Yes for me that is about making macaroons. I was so scared and when they finally where done I was so pride that my head almost the size of a watermelon.


The recipe is from Leila:
http://www.leila.se/english/recipes/pastries/macaroons/index1,71.htm?id=688

I did this in two flavors. Chocolate and vanilla cream. (the Cream is really yellow, this is because the eggs are organic and the hens are grass fed so the yoke then is really yellow) and a neutral with raspberry cream. But I have to say that the raspberry is a bit better, the berry's where frozen so they get a bit sour. This I think is good so that it breaks of all the sweetness.
Love Julia

Tuesday, September 3, 2013

New Craftroom!

 I´m so happy to show you my new craft space! I have moved out to our old stable and are now sitting in my old ponny´s box.  It´s not very big but I have this Ariel "desk" my Aunt painted for my little sister and a heater. It´s not finished but so far I really like having my own space.

The "desk" is not very big but for jewelry making it´s just enough but for scrapbooking... don´t Think so. So far I have my jewelry and canvases and acrylic out in the stable and my scrapbooking in my room. In the winter I will have to find some more economical heating. The good thing is that the light is really good for painting and taking photografs. This two came out a bit red but that is just becuze I had my hand in front of the flash.
So now you´ll know where I spend most of my time. I have so many ideas for this space and if they are ever put to the test you will see them ;)


Love Julia

Art jounal: Night & Day

This art journal page is inspired by night and day, the moon and sun to be more specific. Both page are done in acrylic and the "moon" has a Pearl paint over her hair to get that shining effect. Check out the paint here: Pearlpaint And the best thing is that there is allot of different colors.

I´m in love with this Girls and I hope you like them to
                                                                                            Love Julia

Sunday, September 1, 2013

Scrapbookpage: Lady of the Lake

Today's page is about my Lady of the Lake. She appeared in my sketchbook and later in my watercolor pad. I think it so fun to see how she changes in different mediums.

So here we have a background from dcwv, a craft paper from a notebook and some White paper flowers from Magnolia. This flowers a colored with distress ink and glimmer mist. The leafs and bling is from Pyhobby. The Lady's of the Lake is just photos of the original that I have printed out.


Well that is that I hope you like it

Love Julia